
Delve into the realm of home siding installation where different materials, techniques, and cost considerations converge to create the perfect exterior for your home. Get ready to unravel the mysteries behind durable siding options and essential preparation steps that lead to a seamless installation process.
Types of Home Siding Materials
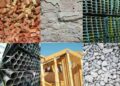
When it comes to home siding installation, there are various materials to choose from, each with its own set of advantages and disadvantages. Here, we will discuss the popular siding options like vinyl, wood, fiber cement, and metal, comparing their pros and cons, durability, maintenance requirements, and how climate and location can impact the choice of siding material.
Vinyl Siding
- Pros: Cost-effective, low maintenance, wide range of colors and styles.
- Cons: Not as durable as other materials, can crack in extreme weather conditions.
- Durability: Typically lasts 20-40 years, depending on quality and maintenance.
- Maintenance: Requires occasional cleaning with soap and water.
Wood Siding
- Pros: Natural aesthetic, environmentally friendly, can be painted or stained.
- Cons: Higher maintenance, susceptible to rot, insects, and moisture damage.
- Durability: With proper maintenance, can last 20-30 years.
- Maintenance: Regular painting, staining, and sealing to prevent damage.
Fiber Cement Siding
- Pros: Durable, fire-resistant, low maintenance, insect-resistant.
- Cons: Higher initial cost, heavy and requires professional installation.
- Durability: Can last 50+ years with minimal maintenance.
- Maintenance: Occasional cleaning and recaulking to maintain integrity.
Metal Siding
- Pros: Extremely durable, fire-resistant, minimal maintenance.
- Cons: Prone to dents, can rust if not properly treated.
- Durability: Can last 40-60 years with little maintenance.
- Maintenance: Inspect for rust and repaint as needed to prevent corrosion.
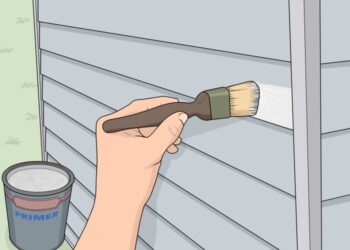
Preparation for Siding Installation

Before installing siding on a home, proper preparation is essential to ensure a successful and long-lasting result. This includes addressing insulation, waterproofing, and the use of sheathing and house wrap.Proper Insulation and Waterproofing:One of the crucial steps in preparing a home for siding installation is ensuring that the house is properly insulated and waterproofed.
Insulation helps regulate the temperature inside the home, while waterproofing protects the structure from moisture and water damage. Without adequate insulation and waterproofing, the siding may not perform as expected and could lead to issues such as mold growth or energy loss.Role of Sheathing and House Wrap:Sheathing is the layer of boards or panels that are installed on the exterior walls of a home before siding is applied.
It provides structural support and a flat surface for the siding to be attached to. House wrap, on the other hand, is a moisture barrier that is installed over the sheathing to prevent water infiltration while allowing the walls to breathe.
Both sheathing and house wrap play a crucial role in the installation process by ensuring a secure and weather-resistant foundation for the siding.
Importance of Proper Insulation and Waterproofing
- Insulation helps maintain a comfortable indoor temperature and reduce energy costs.
- Waterproofing protects the home from water damage, mold, and rot.
- Proper insulation and waterproofing enhance the performance and longevity of the siding.
Role of Sheathing and House Wrap
- Sheathing provides structural support and a smooth surface for siding installation.
- House wrap acts as a moisture barrier to prevent water infiltration and promote breathability.
- Both sheathing and house wrap contribute to the overall durability and weather resistance of the siding.
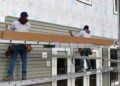
Siding Installation Techniques
Installing home siding can be done using various techniques to achieve different looks and styles. Here, we will explore the different methods, provide a step-by-step guide, discuss the necessary tools and equipment, and share tips for a successful siding installation.
Horizontal Installation
Horizontal siding installation involves placing the siding panels parallel to the ground. This method is commonly used and provides a traditional look to the home exterior.
- Start by measuring and marking the wall for the placement of the siding panels.
- Install the starter strip at the bottom of the wall to ensure a level base for the siding.
- Begin attaching the siding panels one by one, overlapping each panel to create a seamless finish.
- Trim the panels as needed to fit corners and edges for a polished look.
Vertical Installation
Vertical siding installation involves placing the siding panels perpendicular to the ground. This technique offers a unique and modern aesthetic to the home exterior.
- Similar to horizontal installation, start by measuring and marking the wall for panel placement.
- Install the starter strip vertically to create a sturdy base for the siding panels.
- Attach the siding panels from top to bottom, ensuring proper alignment and spacing between each panel.
- Trim the panels accordingly to fit corners and edges for a clean appearance.
Shingle and Panel Installation
Shingle and panel installation techniques involve placing individual shingles or larger panels on the wall to create a textured or uniform look, respectively.
- For shingle installation, start at the bottom and work your way up, overlapping each shingle for weather protection.
- For panel installation, follow manufacturer guidelines for proper alignment and attachment to achieve a seamless finish.
Tools and Equipment
The following tools and equipment are essential for a successful siding installation:
- Hammer
- Nails or screws
- Siding panels or shingles
- Saw for cutting panels
- Level for alignment
- Tape measure
- Caulk and sealant
Tips for Professional Installation
Ensure proper insulation and moisture barrier installation before siding to protect the home from external elements.
Take time to measure and plan the layout of siding panels for a neat and symmetrical finish.
Double-check alignment and spacing of panels to avoid gaps or uneven surfaces.
Use a color scheme that complements the overall aesthetic of the home for a cohesive look.
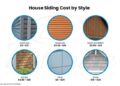
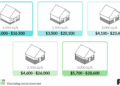
Cost Considerations and Budgeting
When it comes to home siding installation, one of the crucial aspects to consider is the cost involved. Understanding the breakdown of expenses, creating a budget, and finding ways to save on costs are essential steps in ensuring a successful siding project.
Breakdown of Costs
- Materials: The cost of siding materials can vary depending on the type of material chosen, such as vinyl, wood, fiber cement, or metal. It’s essential to consider the durability and maintenance requirements of each material when making your selection.
- Labor: Hiring professionals for siding installation will incur labor costs. The complexity of the project, size of the home, and labor rates in your area will influence this expense.
- Additional Expenses: Miscellaneous costs like permits, equipment rentals, disposal fees, and unexpected repairs can add to the overall project cost. It’s crucial to account for these potential expenses in your budget.
Creating a Budget and Saving on Costs
- Research and Compare: Get multiple quotes from different contractors and suppliers to compare prices and services. This will help you make an informed decision and potentially save money.
- Plan Ahead: Set a realistic budget based on the breakdown of costs and stick to it. Avoid making impulsive decisions that may lead to overspending.
- DIY vs. Professional Installation: While DIY installation can save money on labor costs, it’s important to weigh the benefits of professional expertise and quality workmanship. Consider the trade-offs before deciding.
Return on Investment and Contractor Selection
- ROI for Siding Materials: Different siding materials offer varying levels of durability, energy efficiency, and aesthetic appeal. Consider the long-term benefits and potential increase in property value when choosing a siding material.
- ROI for Installation Methods: Proper installation techniques can enhance the longevity and performance of your siding. Investing in quality installation can result in fewer maintenance expenses in the future.
- Choosing a Reputable Contractor: Look for licensed, insured, and experienced contractors who offer competitive pricing within your budget. Check online reviews, ask for references, and ensure clear communication regarding costs and timelines.
Closing Notes
As we reach the end of this journey through home siding installation, remember that the key to a successful project lies in understanding the materials, techniques, and costs involved. With the right knowledge and preparation, you can transform the look and feel of your home with a stunning new siding installation.
Common Queries
What factors should I consider when choosing a siding material?
Consider factors like durability, maintenance requirements, climate suitability, and overall aesthetic appeal when choosing a siding material.
How can I save money on home siding installation?
You can save money by comparing quotes from different contractors, choosing cost-effective materials, and being strategic about the timing of your installation project.
Do I need to hire a professional contractor for siding installation?
While DIY installation is possible, hiring a professional contractor ensures quality workmanship, adherence to building codes, and timely completion of the project.


